Babies make for adorable drawing subjects. Their chubby cheeks, big eyes, and toothless grins are irresistibly cute.
In this tutorial, we’ll break down step by step how to draw a baby.
We’ll be demonstrating using a simple sketch style, but you can take this basic approach and adapt it to your own preferred drawing style.
With some careful observation and practice, you’ll be drawing adorable baby portraits in no time!
How To Draw A Baby – Step By Step For Kids And Beginners

Step 1: Drawing the Head
For the first step of this guide on how to draw a baby, we shall be starting with the outline of the head.
Draw a large circle towards the top of your paper, leaving room below for the body.
Keeping in mind that a baby’s head is proportionally bigger compared to their body size.
The circle should take up about one third of the space on your page.

Step 2: Drawing the Body
Babies have chubby, soft, and stubby bodies compared to older children or adults. Their limbs are still very short at this stage of development.
Start by drawing a large oval shape that extends from the bottom of the head to represent the bulk of the baby’s body in a sitting position. Make it about 2/3rds the size of the head shape.
Once you have the basic body form blocked in, you can connect the head and body with short, thick diagonal lines for the neck. Remember babies have almost no neck definition compared to adults!
Now we’ve complete this step on of this guide on how to draw a baby, let’s move to the next step.

Step 3: Drawing the Arms and Legs
Now let’s refine the shapes of the limbs. Starting with the nearer arm, draw a bent curve extending from the shoulder out to the hand. Add a slight taper near the wrist to indicate the foreshortening of the arm. Add some wrinkles and folds at the elbow joint.
For the legs, draw a cylinder shape for the thighs and then taper down to the knees which should have some dimples. Below the knees draw the lower legs, making sure to depict the fat, signature ‘baby chub’ shape. Finally, do small mittens or oval shapes for the feet.
Take your time getting the arms and legs shaped right – their pudgy curves and creases can be tricky but are important to making it look like a baby!

Step 4: Outline the Diaper
Before we add details to the face on guide how to draw a baby, let’s draw the outline of the diaper.
Follow the shape of the horizontal lines across the legs, curving them slightly to create a snug fit around the baby’s waist and legs.
Make sure to leave a small space between the diaper and the body to show depth.

Step 5: Adding Details to the Face
Now we can start bringing the face to life, starting with the eyes. Lightly sketch the eyes, making them large and spaced wide apart.
Draw an oval shape for the irises inside each eye outline. Add a small circle in each iris for the catchlight, which helps give the eyes more life.
Below the eyes, add a short, button nose and then a small mouth. Babies have tiny features compared to older children and adults, so keep the proportions petite. Give the mouth a hint of a smile or open, toothless shape.
For the ears, draw them as small ovals on each side of the top of the head. Finally, use smooth, rounded contours to describe the chin and chubby cheek shapes.
Finally, draw in some wispy strands of hair radiating outwards from the crown of the head. Keep the strands loose and irregular rather than combing the hair into a specific style.

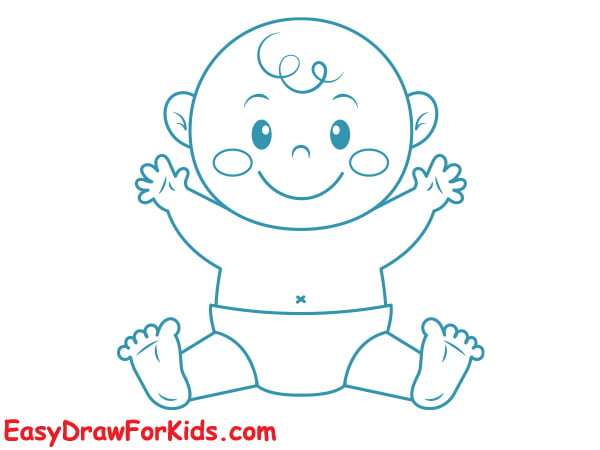
Step 6: Color the Baby Drawing
This is the most fun of all the steps in this guide on how to draw a baby! Color your baby drawing.
Pick natural skin tones and rosy cheek colors that complement the lighting of your portrait. For the diaper, choose a soft pastel palette that doesn’t overpower the body. And don’t forget to paint in some color for the eyes! A light blue or gray can look very sweet and realistic.
Finally, enhance the hair with some light brown, blonde, black or red colored pencil strokes. Go for a subtle, wispy effect rather than solid coloring for best results. And feel free to leave parts of your portrait uncolored, retaining the simplicity of the original sketch.

Tips for Drawing a Baby
Here are some additional tips to keep in mind when learning how to draw a baby:
Observe photo references closely to capture subtle facial features like the rounded button nose, chubby chipmunk cheeks, and large forehead.
Pay attention to proportions – a baby’s eyes are much larger and ears much smaller in relation to their head size compared to an adult.
Little wrinkles and skin folds around the eyes, lips, and limbs will add realism. Babies have chubby flesh that creases easily.
Keep facial features soft and simple. Babies have very smooth, undefined faces without harsh edges or contours.
Add catchlights in the eyes to create a lifelike, bright-eyed gaze. Leave small blank spaces for white highlights.
Use minimal, wispy strokes for the hair rather than drawing in strands individually. This achieves a soft, downy texture.
Choose a sweet, smiling expression to capture the innocence and joy of a baby’s face. But avoid grinning with teeth showing.
Conclusion
Learning how to draw a baby requires careful observation of all their little details, but the results are well worth the effort. Following the steps in this tutorial, you can learn to capture their cute proportions, soft features, and bright-eyed charm. With regular practice, you’ll be able to draw realistic baby portraits from imagination.
Remember to work slowly and methodically, comparing your drawing to reference photos or a live model. Pay attention to little things like wrinkles and baby hairs that add authenticity. And aim for an expression that conveys the endearing innocence of infancy.
We hope you’ve enjoyed learning how to draw a baby! Let me know if you have any other requests for drawing tutorials. Babies are always fun to practice. Keep at it and you’ll be amazing at depicting these little bundles of joy.
You may also enjoy:

Leave a Reply