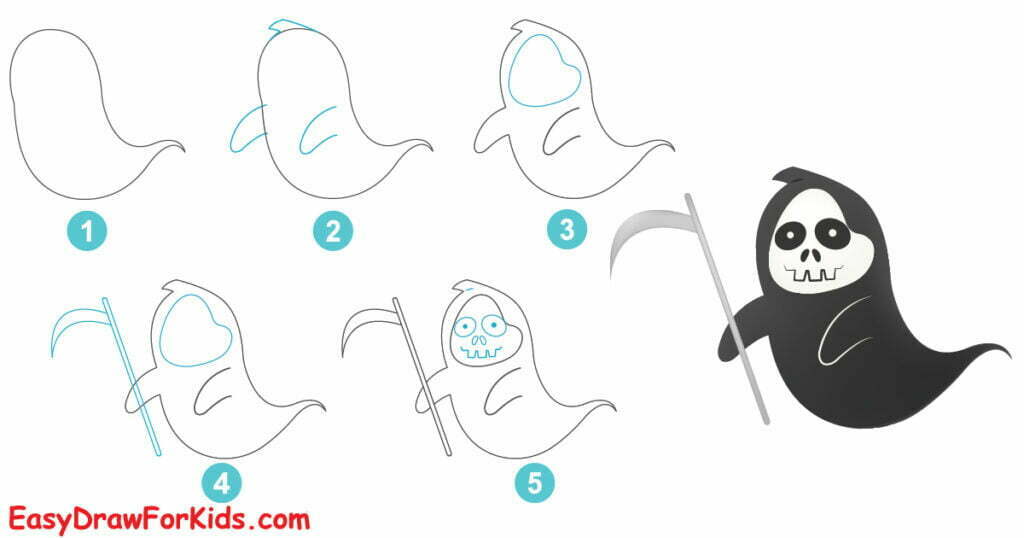
The grim reaper, otherwise known as the personification of death, is a common character in cartoons and other media.
In this guide, easydrawforkids.com will help you learn how to draw a grim reaper in a simple, easy-to-follow way.
How To Draw A Grim Reaper – A Step By Step Guide

Step 1: Draw A Basic Shape
Draw a long, curved line extending downward and slightly inward at the bottom.
Extend the lines further down to create the body of the grim reaper. Make the body narrow and elongated.

Step 2: Draw the Hands
Draw two arms extending from the sides of the body.
At the end of one arm, draw a small oval shape for the hand holding the scythe.

Step 3: Outline The Hood Of Grim Reaper
Draw an oval shape inside the head to create the hood.

Step 4: Sketch The Scythe
Draw a straight line start from the midpoint of the handle and extend outward for the handle of the scythe.
Now, creating the curved shape of the blade using long, sweeping lines. The end of the blade should have a pointed edge.

Step 5: Add The Facial Features
Draw two large oval-shaped eyes on the middle line.
Below the eyes, draw a small, curved line for the nose.
Draw a wide, curved smile below the nose.
Add sharp teeth at the ends of the smile.

Step 6: Color The Grim Reaper Drawing
Dark colors like black, gray, or deep purple work well for the character’s clothing and features.
You can use lighter colors for the eyes, teeth, and scythe.

With the simple step-by-step, anyone easily illustrate the grim reaper in your own unique style.
Happy drawing!


