Have you ever been captivated by the beauty of a sunset and wished you could capture its essence on a piece of paper?
The vibrant hues, the soft glow, and the peaceful atmosphere can truly create a mesmerizing scene.
If you’re wondering how to draw a sunset, look no further.
In this guide, we will walk through a simple process for creating vibrant and realistic sunsets in your art.
How to Draw a Sunset – A Step by Step Guide
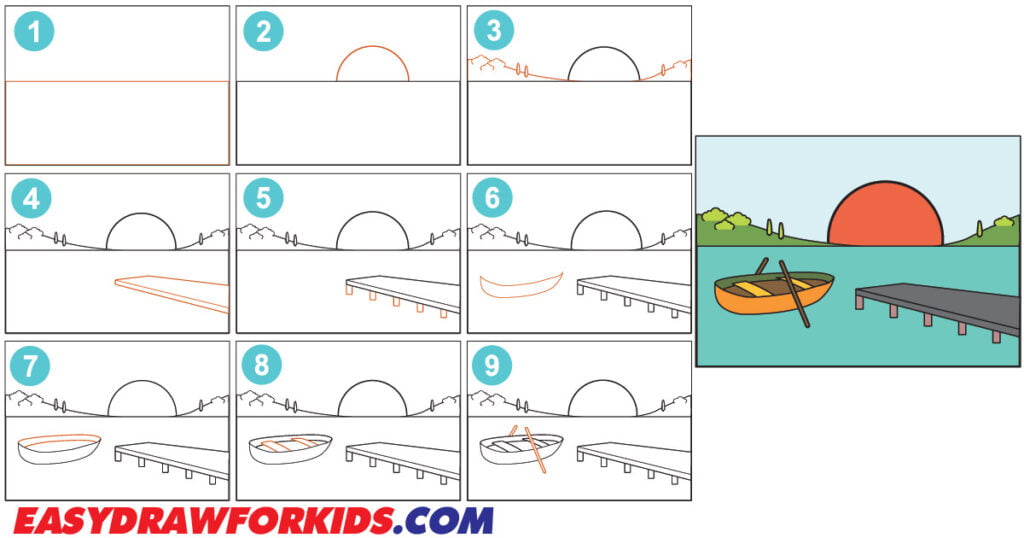
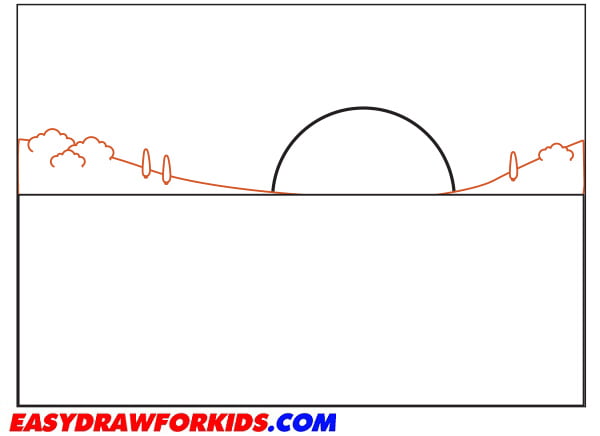
Before we dive into the drawing process, it’s important to understand the different elements that make up a sunset.
A sunset consists of various colors, including reds, oranges, yellows, and pinks, all blending seamlessly together.
The sun is typically depicted as a large yellow or orange ball, and the sky can vary from bright blue to deep purple depending on the time of day.
Additionally, clouds may be present in the sky, adding texture and depth to the overall scene.

This guide on how to draw a sunset in 10 steps to help you drawing a beautiful sunset with ease!
Step 1: Setting the Horizon Line
The first step in our guide on how to draw a sunset is to determine the placement of the horizon line. The horizon line is where the sky meets the land or sea.
Use a light pencil to lightly draw a straight line across your paper, near the bottom. This line will act as your reference point for the rest of the drawing.

Step 2: Draw the Sun
Above the horizon line, draw a large half-circle. This will be the setting sun. Place it wherever you’d like on the horizon.

Step 3: Sketch the Background
Now it’s time to start adding some details to your background. Begin by sketching the basic shapes of the elements you’ve chosen, such as mountains or trees.
Keep the lines loose and light, as they will be refined later. Remember, this is just the initial foundation of your artwork.

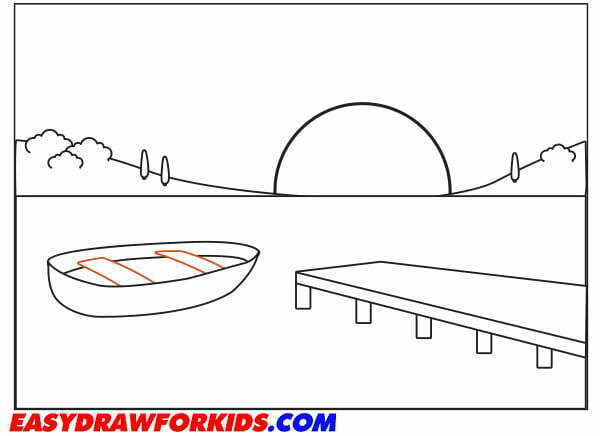
Step 4: Draw the Wooden Bridge
The fourth step of this guide on how to draw a sunset will focus on the wooden bridge.
Draw two parallel lines that slope slightly upward from the waterline. These lines will form the sides of the bridge.
The length and angle of the lines will depend on the size and style of the bridge you want to draw.

Step 5: Draw the bottom of the Bridge
Sketch two pairs of vertical lines between the top and bottom of the bridge to represent the support posts.
These posts can be evenly spaced or vary in distance depending on the design you want to create.

Step 6: Draw the Rowboat
Sketch a long, slightly curved shape above the waterline. This will be the main body of the rowboat, known as the hull.
The front end of the shape should be more pointed, while the back end should be slightly wider.

Step 7: Draw the sides of the Boat
Extend two slightly curved lines from the sides of the boat’s hull to form the gunwales or sides of the boat. These lines should follow the contour of the hull and meet near the front and back.
Draw two slightly curved lines extending from the front of the boat to represent the stem. These lines should gently slope upward and meet at a point.

Step 8: Draw the Seat
Add two smaller rectangle shape near the front of the main shape to represent the seat or bench of the rowboat. This rectangle should be positioned horizontally across the hull.

Step 9: Draw Oarlocks
Sketch two oarlocks near the seat or bench. These can be represented by small rectangular shapes attached to the gunwales at the sides of the rowboat.

Step 10: Color the Drawing
Now that we’ve successfully this guide how to draw a sunset, it’s time to bring your sunset art to life with color!
The beauty of a sunset lies in its vibrant colors and captivating hues. Here’s how you can infuse life into your drawing:
Sunset Glow: Start by visualizing the dominant colors of the sunset. Typically, sunsets feature warm tones like oranges, pinks, purples, and yellows. Use light strokes to fill the sky area with these hues, blending them gradually from top to bottom.
Clouds and Silhouettes: Study your reference image to understand the shapes and patterns of clouds during a sunset. Sketch them lightly, leaving some areas untouched to represent the highlights and shadows. Similarly, add silhouettes of trees, mountains, or other elements to enhance the depth and contrast of your drawing.
By focusing on these key aspects, you can create a vivid and captivating representation of a sunset.

Your drawing is now complete! Congratulations on learning how to draw a sunset.
Tips for Drawing a Sunset
Here are a few tips to keep in mind as you learn how to draw a sunset:
- Study real-life sunsets: Take the time to observe sunsets in person or study photographs to familiarize yourself with the colors, lighting, and overall atmosphere.
- Practice blending techniques: Mastering blending techniques will be crucial in creating smooth gradients and seamless transitions between colors.
- Use reference photos: If you’re unsure about certain elements or need inspiration, refer to reference photos to guide you through the drawing process.
- Embrace creativity: While it’s essential to stay true to reality, don’t be afraid to incorporate your own artistic touch and experiment with different color variations or compositions.
Examples of How to Draw a Sunset
There are many creative ways to portray a sunset. Here are some fun sunset drawing ideas to try:
- Silhouette foreground objects like trees or buildings against the sunset. This creates a dramatic scene.
- Paint a sunset over mountains, canyons, or other epic landscapes. This combines the grandeur of nature with the sunset’s glory.
- Draw a romantic beach sunset with two figures hand-in-hand along the shore.
- Portray a vibrant urban sunset over a city skyline. Include buildings, bridges, and other landmarks.
- Paint a sunset over a field of flowers, blending the blooms’ colors with the dusk sky.
- Feature a windmill, lighthouse, dock, or other structural detail set against the sunset. This gives a sense of place.
- Capture the sunset’s reflection on a lake for a tranquil, mirror-like effect.
With so many options, you could paint sunsets every day and never repeat yourself! As you practice, continue observing sunsets in life and in photos. Take note of special details you want to portray.
With dedication, you’ll be able to reproduce nature’s beauty through your unique artistic vision. The glowing, magical light of dusk is a gift for all artists.
Conclusion
Sunsets make an inspiring subject to paint or draw.
By following some basic principles of color theory, composition, perspective, and value contrast, you can create beautiful scenes filled with warmth and lighting.
Pay special attention to the direction of the light and shadows, and strive for harmonious blending.
With practice over many sunsets, your artistic scenes will improve.
Mastering this joyful subject will bring impressive, light-filled artworks to life.
We hope this guide has been helpful for those interested in learning how to draw a sunset.
You may also enjoy:
Leave a Reply