Welcome to the ultimate guide on How To Draw A Christmas Scene for 2023!
This step-by-step process will help you bring the cheer and warmth of a Christmas scene to life.
From festive decoration to snowy landscapes, we’ll cover it all in this detailed tutorial.
So grab your pencils, paper, and a cup of hot cocoa, as we embark on a jolly artistic journey!
How To Draw A Christmas Scene – A Step by Step Guide
Before diving into how to draw a Christmas scene, it’s important to gather inspiration.
Take a stroll through your neighborhood adorned with twinkling lights, visit a local Christmas market, or simply search online for images that capture the essence of the holiday season.
Look for elements such as snow-covered landscapes, cozy homes with roaring fireplaces, decorated trees, and joyful characters like Santa Claus and his reindeer.

This guide on how to draw a christmas scene, it can be a bit more complex, but don’t be afraid to take your time and refer closely to the reference image.
Step 1: Sketch out the horizon
Start by drawing a horizon line to establish the ground and sky.
You can draw a straight line across your paper, indicating where the ground and sky meet.
Add a simple shape for the ground. Draw a wavy or curved line below the horizon line to represent the snowy ground.

Step 2: Draw the Moutains
From the horizon line, draw two diagonal lines that converge towards the top. These lines will form the sides of the mountain.
Connect the upper ends of the diagonal lines with a curved or jagged line to create the peak of the mountain. The shape of the peak can vary depending on the style of mountain you want to draw. For example, it can be sharp and pointed or rounded and rolling.
Add more details to the mountain by drawing additional jagged lines along the sides. These lines can represent snow rocky outcrops or ridges on the mountain.

Step 3: Sketch out the House
Start by drawing a rectangle shape near the center of your paper. This will be the main structure of the house.
Add a square or rectangular shape on either side of the door to represent windows.

Step 4: Draw the front of the House
Add a porch by extending a rectangular shape from the front of the house and adding columns or railings.
Draw a smaller rectangle shapes within the larger rectangle, near the bottom, to represent the door of the house.

Step 5: Draw a Roof Top and Chimney
Add a triangle shape on top of the rectangle to form the roof of the house. The triangle’s base should align with the top edges of the rectangle.
Draw a chimney on one side of the roof by adding a rectangular shape extending slightly above the roofline.

Step 6: Drawing a Snowman
In this step in our guide on how to draw a christmas scene will forcus on snowman
Drawing a large circle near the bottom of your paper. This will be the base of the snowman.
Above the first circle, draw a slightly smaller circle to form the head of the snowman.
Connect the circles together using curved lines to create the body of the snowman.

Step 7: Add the Details
Draw two small circles within the head circle to represent the eyes.
Below the eyes, draw a curved line for the snowman’s smile or mouth.
Add a small carrot-shaped triangle protruding from the center of the head circle to create the snowman’s nose.
Add a hat on top of the snowman’s head by drawing a rectangle shape or a rounded shape with a brim.
Draw a scarf around the snowman’s neck by adding a wavy line that drapes across the middle section.

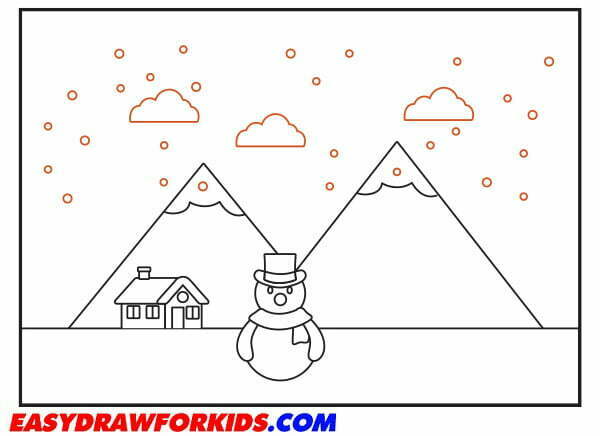
Step 8: Add falling Snow and Clouds
Start by drawing a fluffy, irregular shape. Clouds are often puffy and have soft edges, so you can use curved lines to create a shape that resembles a cloud. It can be circular, oval, or even elongated depending on the type of cloud you want to draw.
You can also add smaller cloud-like shapes within the larger cloud to create more depth and texture. These smaller shapes can be placed randomly throughout the cloud.
Use small, curved lines or dots throughout the scene to represent falling snowflakes. You can also add larger snowflakes on the ground or on the branches of the tree.

Step 9: Draw the Christmas Trees
Start by drawing a triangular shape in the center or to one side of the scene.
Add branches and smaller triangles within the main triangle to represent the layers of the tree.
You can also draw decorations, such as ornaments or lights, on the tree.
Then drawing some smaller christmas tree as shown the picture

Step 10: Coloring Your Creation – Making It Merry and Bright
We’ve successfully this guide how to draw a christmas scene, now comes the fun part – coloring your Christmas scene!
Select a range of colors that reflect the festive spirit, such as vibrant reds, deep greens, and shimmering golds.
Use colored pencils, markers, or even watercolors to bring your drawing to life.
Start by applying base colors to different elements in your scene.
For instance, color the houses and buildings with warm earth tones, the trees with shades of green, and the sky with soft blues or purples.
Then, gradually add highlights and shadows to enhance the three-dimensional effect.

Your drawing is now complete! Congratulations on learning how to draw a christmas scene.
Tips for Drawing Christmas Scenes
Part of learning how to draw a christmas scene is accepting imperfections along the way. When issues pop up, these tips can help overcome common obstacles:
- Start with a simple sketch – don’t worry about perfection!
- Focus on the main characters or objects, adding details around them.
- Adjust and condense parts of the scene if you run out of room. Overlap objects to give the illusion of depth.
- Use slow, controlled strokes as you outline. For bad lines, erase and redo straighter.
- The more Christmas scenes you draw, the more your skills will improve over time.
Conclusion
Learning how to draw a Christmas scene is an easy, rewarding way to celebrate the spirit of the season.
With a bit of sketching, and a dose of creativity, anyone can design a fun, colorful holiday drawing.
Pay attention to composition, add festive details, and don’t be afraid to put your own spin on traditional images.
Overcome challenges through practice and remembering that imperfection is part of the artistic process.
Most importantly, relax and have fun bringing your unique Christmas vision to life on paper.
The memories made while drawing will become a treasured gift you can enjoy for holidays to come.
You may also enjoy:
Leave a Reply