If you want to learn how to draw a tiger, you’ve come to the right place!
In this tutorial, easydrawforkids.com shows you six ways to draw a tiger.
How To Draw A Tiger – A Step By Step Guide
1. Realistic Tiger Drawing
Step 1: Start with a large oval to represent the tiger’s head and three smaller circle for the paw.
![realistic tiger drawing step 1](https://easydrawforkids.com/wp-content/uploads/2023/07/realistic-tiger-drawing-step-1.jpg)
Step 2: In this step on guide how to draw a tiger, you will draw the outline of the body, following the basic oval shape you sketched in step 1.
![realistic tiger drawing step 2](https://easydrawforkids.com/wp-content/uploads/2023/07/realistic-tiger-drawing-step-2.jpg)
Step 3: Now, you draw the front and hind legs, starting with simple cylindrical shapes and gradually refining them to capture the musculature and the curve of the paws.
![realistic tiger drawing step 3](https://easydrawforkids.com/wp-content/uploads/2023/07/realistic-tiger-drawing-step-3.jpg)
Step 4: Next, you draw circle for the eyes, and nose with wide nostrils.
The mouth can be depicted as a curved line with a slight downward angle.
Then, add the ears to the top of the head, shaping them like semicircles.
![realistic tiger drawing step 4](https://easydrawforkids.com/wp-content/uploads/2023/07/realistic-tiger-drawing-step-4.jpg)
Step 5: Add detail to the face to give the tiger a fierce expression.
![realistic tiger drawing step 5](https://easydrawforkids.com/wp-content/uploads/2023/07/realistic-tiger-drawing-step-5.jpg)
Step 6: Draw the tail, starting from the base and gradually tapering it towards the tip.
![realistic tiger drawing step 6](https://easydrawforkids.com/wp-content/uploads/2023/07/realistic-tiger-drawing-step-6.jpg)
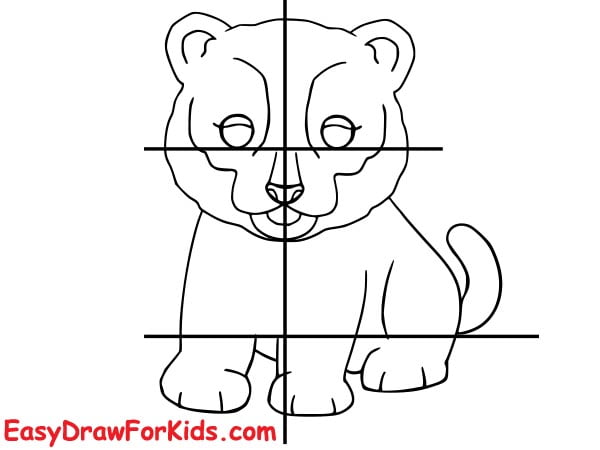
Step 7: One of the most distinctive features of a tiger is its striped pattern. Using curved lines to follow the contours of the tiger’s body.
![realistic tiger drawing step 7](https://easydrawforkids.com/wp-content/uploads/2023/07/realistic-tiger-drawing-step-7.jpg)
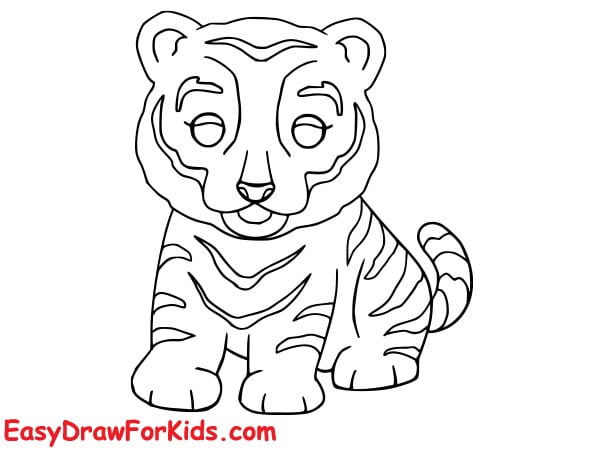
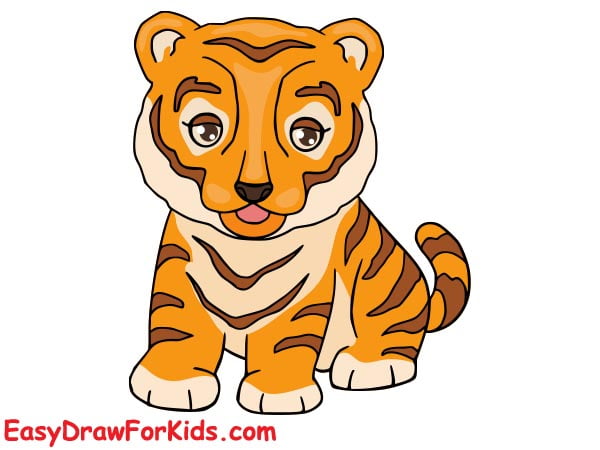
Step 8: Coloring realistic tiger drawing
![realistic tiger drawing step 8](https://easydrawforkids.com/wp-content/uploads/2023/07/realistic-tiger-drawing-step-8.jpg)
2. Tiger Face Drawing
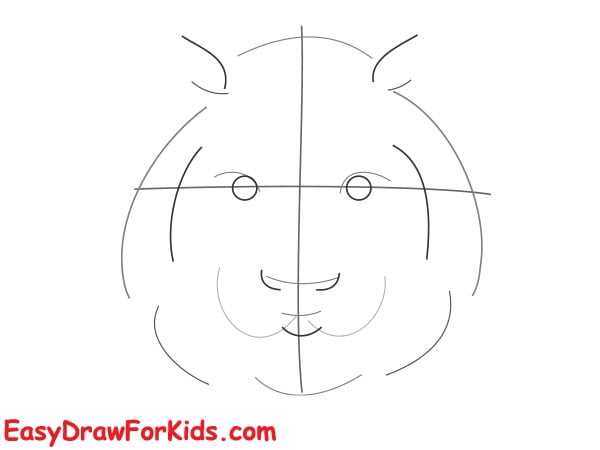
Step 1: Begin by lightly sketching the basic shapes that form the foundation of lion face drawing.
![tiger face drawing step 1](https://easydrawforkids.com/wp-content/uploads/2023/07/tiger-face-drawing-step-1.jpg)
Step 2: Using light strokes to outline the shape of the tiger’s head
![tiger face drawing step 2](https://easydrawforkids.com/wp-content/uploads/2023/07/tiger-face-drawing-step-2.jpg)
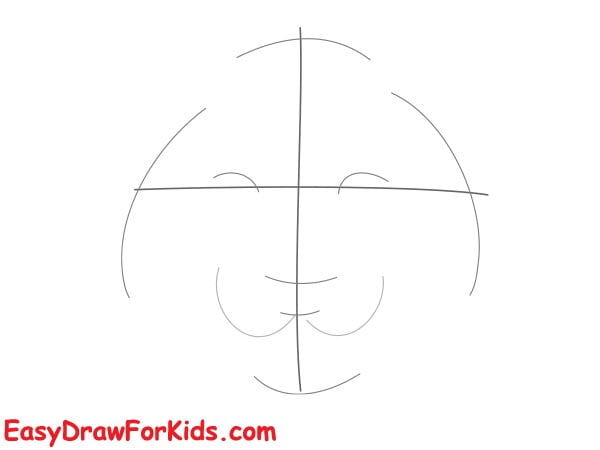
Step 3: Now, you sketching the ears, eyes, and nose of tiger.
![tiger face drawing step 3](https://easydrawforkids.com/wp-content/uploads/2023/07/tiger-face-drawing-step-3.jpg)
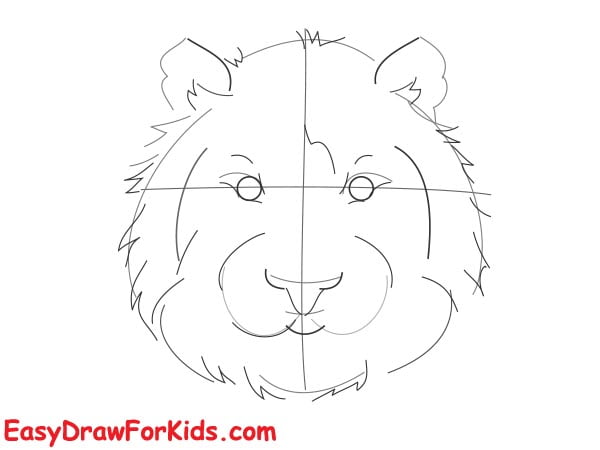
Step 4: Next, you add fur details around the face
![tiger face drawing step 4](https://easydrawforkids.com/wp-content/uploads/2023/07/tiger-face-drawing-step-4.jpg)
Step 5: And it’s time to laying down a base coat of orange over the entire tiger face.
![tiger face drawing step 5](https://easydrawforkids.com/wp-content/uploads/2023/07/tiger-face-drawing-step-5.jpg)
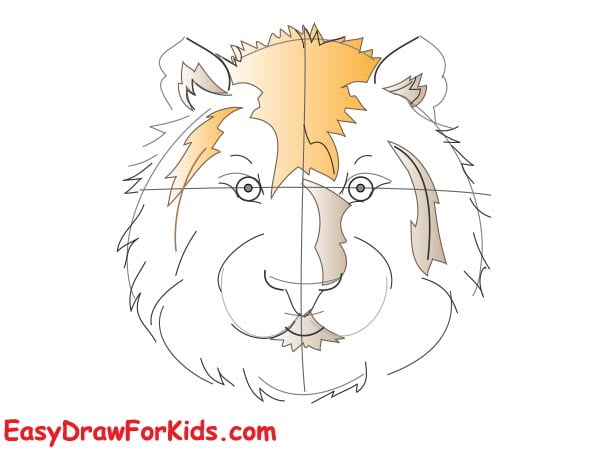
Step 6: Use a darker orange or brown color to add shadows around the eyes, nose, and cheekbones.
![tiger face drawing step 6](https://easydrawforkids.com/wp-content/uploads/2023/07/tiger-face-drawing-step-6.jpg)
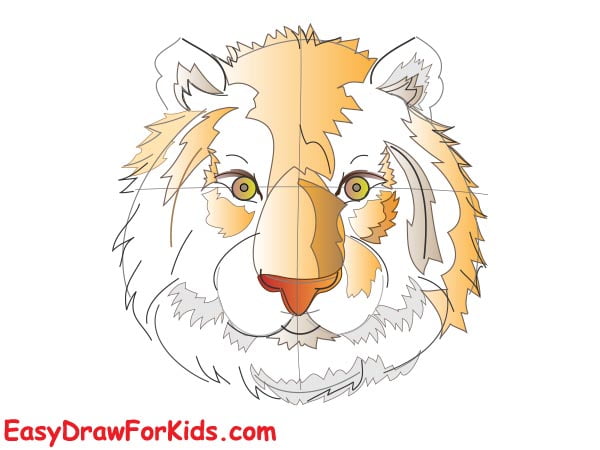
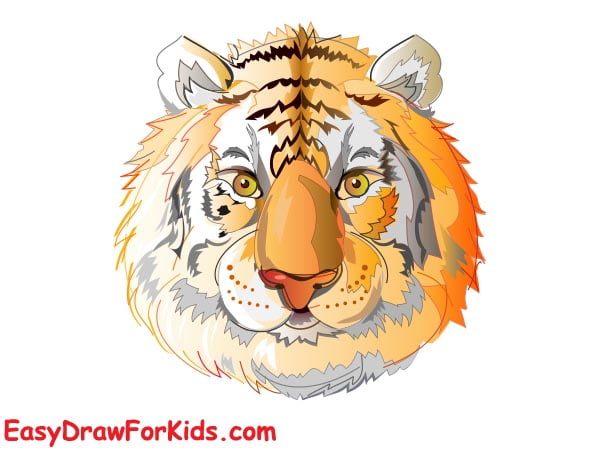
Step 7: Outline the tiger’s distinctive stripes
![tiger face drawing step 7](https://easydrawforkids.com/wp-content/uploads/2023/07/tiger-face-drawing-step-7.jpg)
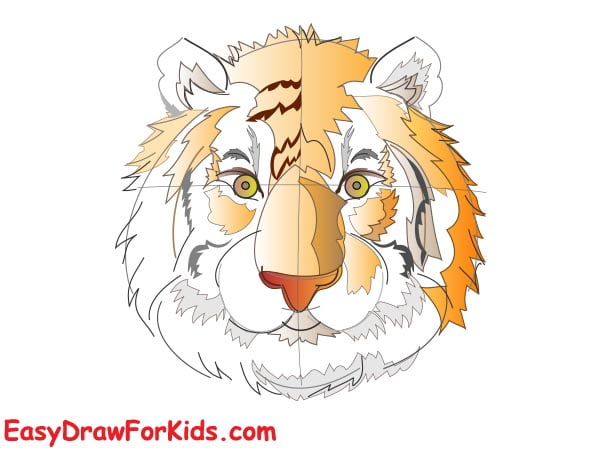
Step 8: Use a lighter orange to add highlights along the bridge of the nose, above the eyes, and on the cheekbones.
![tiger face drawing step 8](https://easydrawforkids.com/wp-content/uploads/2023/07/tiger-face-drawing-step-8.jpg)
Step 9: Finish by adding whiskers, darken the areas around the nose and mouth
![tiger face drawing step 9](https://easydrawforkids.com/wp-content/uploads/2023/07/tiger-face-drawing-step-9.jpg)
3. Fat Tiger Drawing
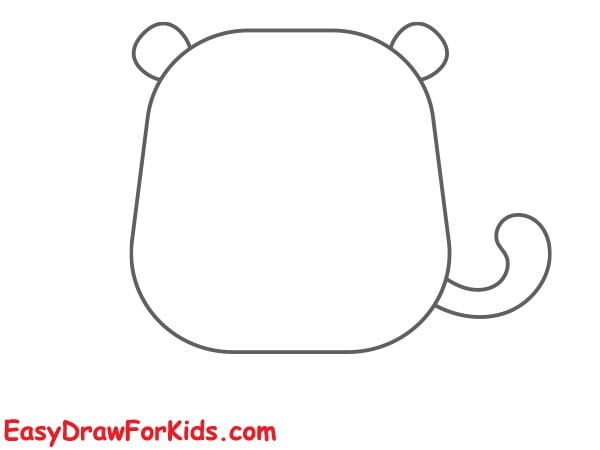
Step 1: The first step on guide how to draw a tiger, you draw a large oval shape to represent the tiger’s body and head.
![fat tiger drawing step 1](https://easydrawforkids.com/wp-content/uploads/2023/07/fat-tiger-drawing-step-1.jpg)
Step 2: Now, adding a tail and round ears for the fat tiger
![fat tiger drawing step 2](https://easydrawforkids.com/wp-content/uploads/2023/07/fat-tiger-drawing-step-2.jpg)
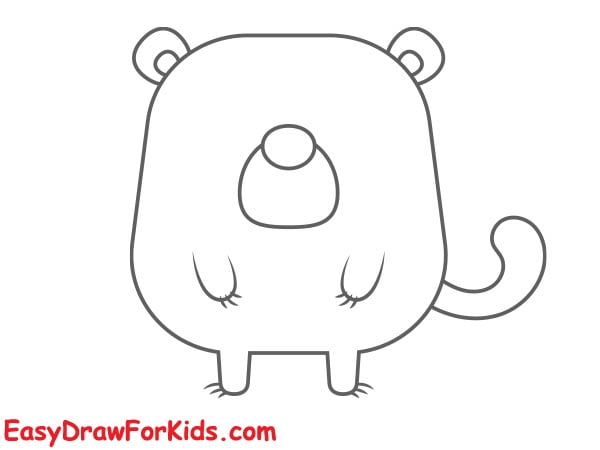
Step 3: Next, extend four curved lines to form the legs, as shown in the picture.
![fat tiger drawing step 3](https://easydrawforkids.com/wp-content/uploads/2023/07/fat-tiger-drawing-step-3.jpg)
Step 4: Draw two oval shape overlap each other to form the snout, then adding claws for your fat tiger
![fat tiger drawing step 4](https://easydrawforkids.com/wp-content/uploads/2023/07/fat-tiger-drawing-step-4.jpg)
Step 5: It’s time to add details to the face and stripes
![fat tiger drawing step 5](https://easydrawforkids.com/wp-content/uploads/2023/07/fat-tiger-drawing-step-5.jpg)
Step 6: Coloring fat tiger drawing
![fat tiger drawing step 6](https://easydrawforkids.com/wp-content/uploads/2023/07/fat-tiger-drawing-step-6.jpg)
4. Sleeping Tiger Drawing
Step 1: At first, draw a large oval shape for the tiger’s head, then add two ears on the top of the head
![sleeping tiger drawing step 1](https://easydrawforkids.com/wp-content/uploads/2023/07/sleeping-tiger-drawing-step-1.jpg)
Step 2: Now, you draw the front legs in front of the head
![sleeping tiger drawing step 2](https://easydrawforkids.com/wp-content/uploads/2023/07/sleeping-tiger-drawing-step-2.jpg)
Step 3: Next, extend two straight lines for the tiger’s body and hind legs.
![sleeping tiger drawing step 3](https://easydrawforkids.com/wp-content/uploads/2023/07/sleeping-tiger-drawing-step-3.jpg)
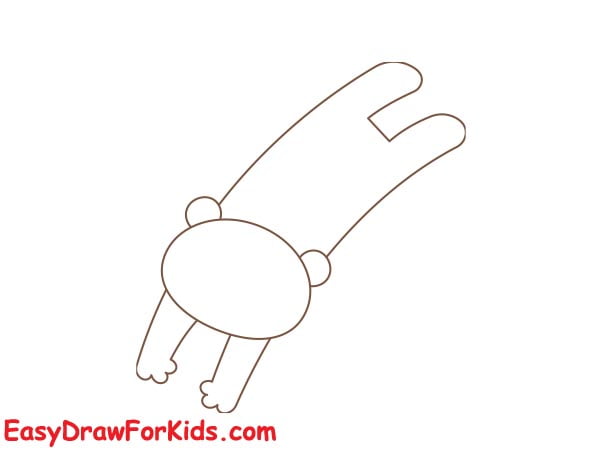
Step 4: Draw the tiger’s facial features, including the eyes, nose, and mouth.
Sketch the tiger’s tail by drawing a long, curving line starting from the back end of the body.
![sleeping tiger drawing step 4](https://easydrawforkids.com/wp-content/uploads/2023/07/sleeping-tiger-drawing-step-4.jpg)
Step 5: Add the distinctive tiger stripes by drawing a series of curved, parallel lines across the body and legs.
![sleeping tiger drawing step 5](https://easydrawforkids.com/wp-content/uploads/2023/07/sleeping-tiger-drawing-step-5.jpg)
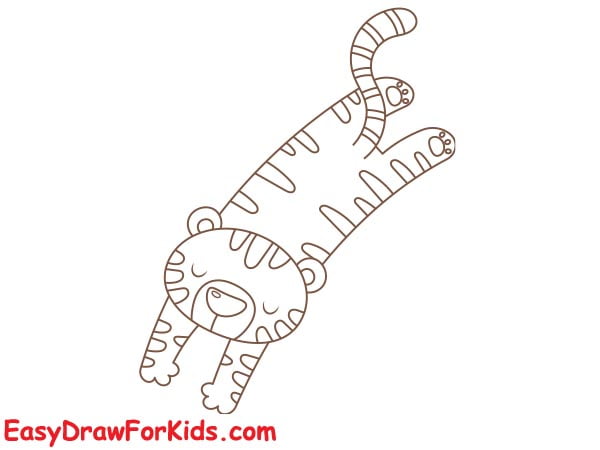
Step 6: Color the tiger using a range of orange, brown, black, and white tones.
![sleeping tiger drawing step 6](https://easydrawforkids.com/wp-content/uploads/2023/07/sleeping-tiger-drawing-step-6.jpg)
5. Easy Tiger Drawing
Step 1: Start by drawing a circle for the head, then draw the eyes, nose, and mouth inside the outline of the head.
![how to draw a cute tiger step by step](https://easydrawforkids.com/wp-content/uploads/2023/07/how-to-draw-a-cute-tiger-step-by-step.jpg)
Step 2: At the top of the head, draw two ears and draw an oval shape around the nose and mouth.
![easy drawing tiger](https://easydrawforkids.com/wp-content/uploads/2023/07/easy-drawing-tiger.jpg)
Step 3: Draw the torso below the head.
![tiger drawing cute](https://easydrawforkids.com/wp-content/uploads/2023/07/tiger-drawing-cute.jpg)
Step 4: Depict the legs and paws using traights and curved lines of different lengths.
![tiger easy draw](https://easydrawforkids.com/wp-content/uploads/2023/07/tiger-easy-draw.jpg)
Step 5: On the left side of the body draw a rounded line for the tail.
![drawing tiger step by step](https://easydrawforkids.com/wp-content/uploads/2023/07/drawing-tiger-step-by-step.jpg)
Step 6: Now, draw the stripes on the body of the tiger using triangle lines
![sketch tiger drawing](https://easydrawforkids.com/wp-content/uploads/2023/07/sketch-tiger-drawing.jpg)
Step 7: Your cartoon tiger is now complete! You can color it in or leave it as a line drawing.
![drawing tiger easy](https://easydrawforkids.com/wp-content/uploads/2023/07/drawing-tiger-easy.jpg)
>>>Read more: How To Draw A Pig – 8 Ways (With Pictures)
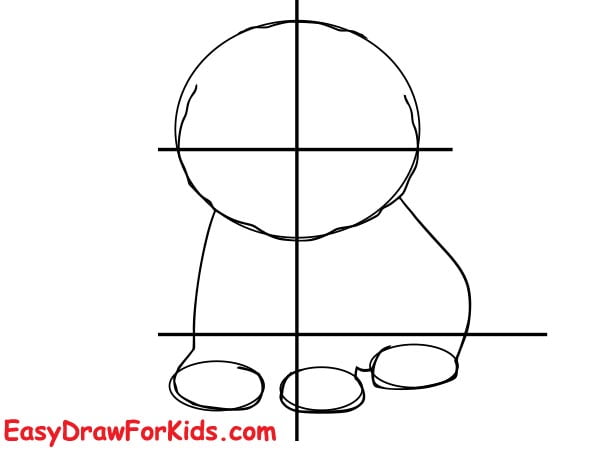
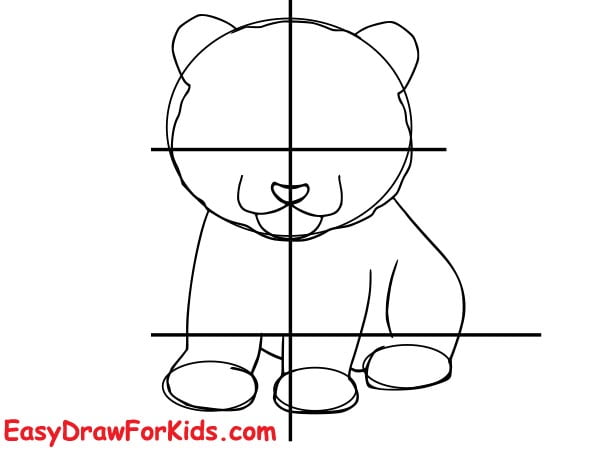
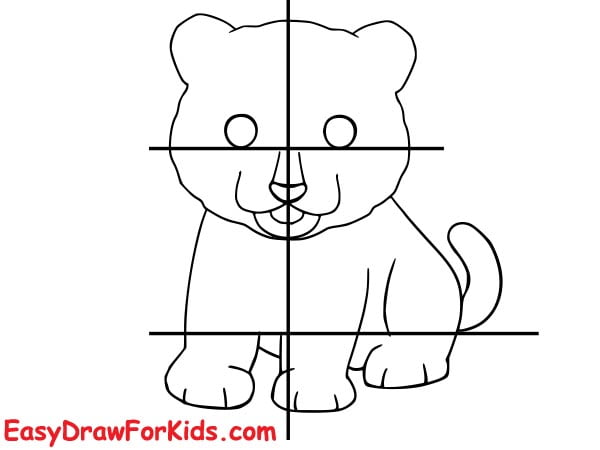
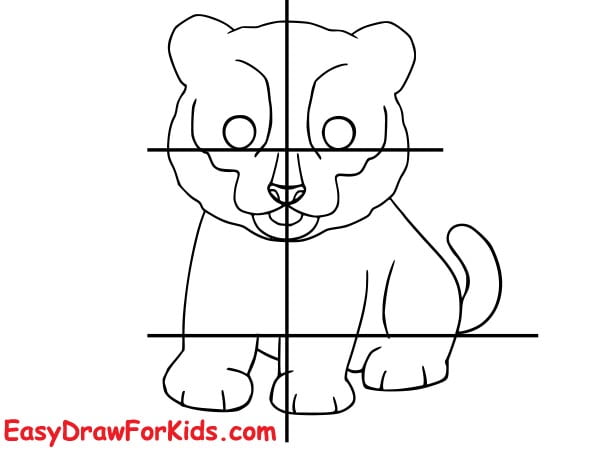
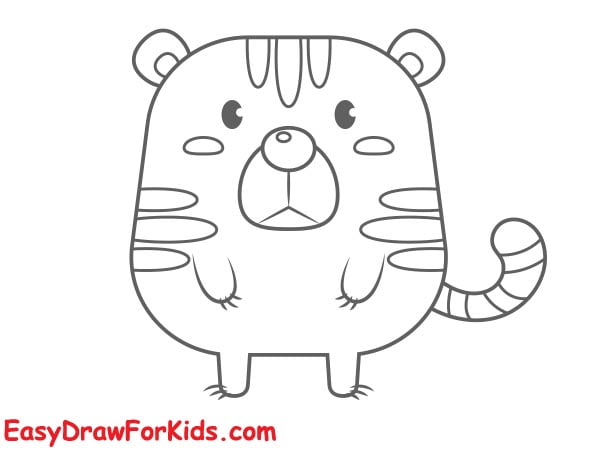
6. Cute Tiger Drawing
Step 1: The first step in guiding how to draw a tiger is to depict the head as a deformed oval shape. Then, draw the nose and eyes of a cute tiger.
![tigers drawing easy](https://easydrawforkids.com/wp-content/uploads/2023/07/tigers-drawing-easy.jpg)
Step 2: Now, draw the torso, mouth and ears for cute tiger, as shown in the picture.
![cute tiger drawings](https://easydrawforkids.com/wp-content/uploads/2023/07/cute-tiger-drawings.jpg)
Step 3: Draw three short lines on the sides of the muzzle for the mustache.
Draw the legs by drawing four small ovals beneath the body.
![drawing cute easy](https://easydrawforkids.com/wp-content/uploads/2023/07/drawing-cute-easy.jpg)
Step 4: Add two more leg using curved lines. Then, draw the tail by using a long curved line that starts at the back of the body.
![drawing simple tiger](https://easydrawforkids.com/wp-content/uploads/2023/07/drawing-simple-tiger.jpg)
Step 5: Draw the tiger’s stripes by drawing a series of curved lines across the face and body.
![cute tiger drawing](https://easydrawforkids.com/wp-content/uploads/2023/07/cute-tiger-drawing.jpg)
Step 6: To color the cute tiger, use dark and light orange and also black.
![tiger cute](https://easydrawforkids.com/wp-content/uploads/2023/07/tiger-cute.jpg)
>>>Read more: How To Draw A Cow – 7 Ways (With Pictures)
Now you know how to draw a tiger, and there is one more animal in your collection of drawings.
I hope you enjoyed this lesson; why not draw a whole family of them?
Do not forget to subscribe to us on social networks so as not to miss the next interesting lessons.
Leave a Reply