If you’re looking to add a tropical touch to your artwork, drawing a palm tree is a fantastic place to start.
In this tutorial, easydrawforkids.com will teach you how to draw a palm tree in just a few simple steps.
How to Draw a Palm Tree – A Step by Step Guide
Here are two different styles you can try when you learn how to draw a palm tree step by step
1. Easy Palm Tree Drawing

Step 1: Draw the Trunk
Start by lightly sketching a vertical, slightly curved line to represent the trunk.
The trunk should take up about 1/3 of the overall height of the tree.
Vary the thickness, making it wider at the base and tapering towards the top.

Step 2: Draw two Palm Leaves
Palm leaves radiate outward from the crown shaft in a spiral pattern.
Using long, curved arcs that get progressively smaller to draw palm leaves.

Step 3: Sketch out two more leaves above the previously drawn leaves.

Step 4: Draw palm leave on top of the two leaves drawn in the step 3.

Step 5: Decorative the Trunk
Finally, add texture to the trunk by drawing small lines along the length of the trunk.
These lines should be drawn in different directions to imitate the natural texture of the bark.

Step 6: Color the Palm Tree
Now you successfully this guide how to draw a palm tree, it’s time to bring your palm tree art to life with color!
Palm tree trunks are usually a tan or brown color.The fronds are often a bright or yellowish green.
Add some blue to the sky and you have a complete tropical scene!

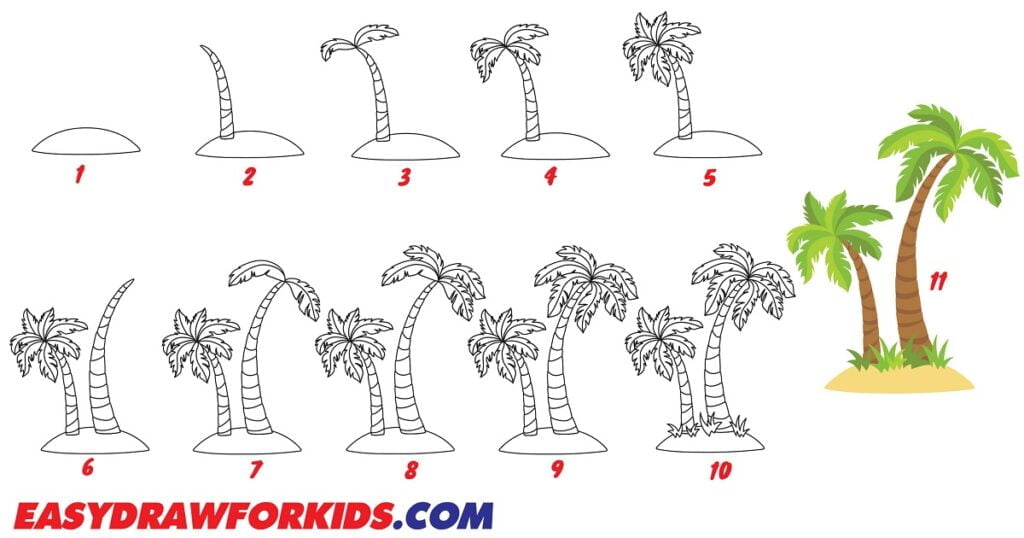
2. Simple Palm Tree Drawing

Step 1: In this first step in this guide on how to draw a palm tree by using curved lines to draw the ground

Step 2: Using curved lines to depict the trunk, and add texture the trunk as shown the picture.

Step 3: Draw the Palm Leaves
Draw two diagonal lines at the top of the trunk to form a “V” shape.
Starting from the “V” shape on top of the trunk, draw several long, curved lines that extend outward.
Next, draw smaller curves coming out from the sides of the larger curves, creating a feathery effect.
Continue drawing these curves until you have a full, lush frond.
Repeat this process on the other side of the trunk to create a symmetrical palm tree.

Step 4: Repeat this process for creating two leaves below the previously drawn leaves

Step 5: Continous draw three leaves at the top to complete the left palm tree

Step 6: Draw the lager trunk palm tree on the right as shown the picture

Step 7: Repeat this process for creating two leaves in step 3 but draw larger

Step 8: Now add two palm leaves on top of the two leaves drawn in the seventh step.

Step 9: Draw two leaves below the previously drawn leaves.

Step 10: Add the details and Grasses
To add more detail to the palm fronds, draw small lines extending from the large curved lines.
These lines should be drawn in different directions to give the fronds a more natural appearance.
Draw a horizontal line across the bottom with small bumps to represent ground and grass tufts.

Step 11: Using light green, green, dark green, brown, yellow to color the palm tree

Following the basic steps in this guide, you can draw a realistic palm tree.
With practice, you can portray graceful palm trees in a variety of styles.
Let palm drawing transport you to dreamy tropical scenes!


